Literally two-audible beats, binaural beats describe a beat pattern
that occurs when two tones of similar frequency are combined.
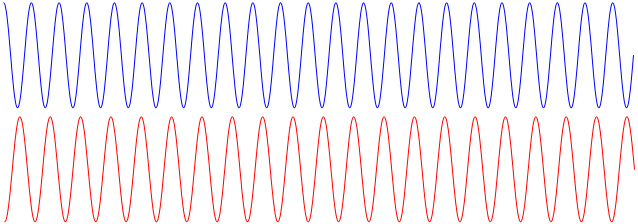
For example suppose we take two sound waves, shown here in blue and red:
The blue wave has a slightly higher frequency it has more waves
per second than the red wave. If we draw them overlapping we
can compare better:
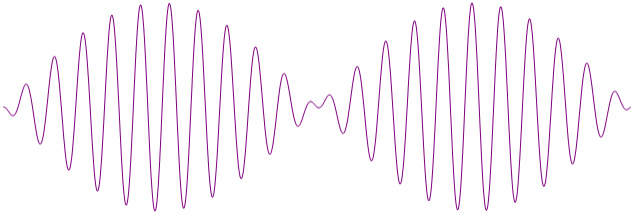
Now if we add them together we get a new combined wave as follows:
As expected, the overall height doubles. But now there are
two lumps in the pattern. If we zoom out we see this:
A new wave pattern has appeared that slowly changes the amplitude
(height) of the underlying wave. This is the binaural beat
pattern.
What does this sound like? Watch the below video.
It plays three sounds. The first is a pure tone of 100Hz, the
second is a pure tone of 108Hz, and the third is the combination of
these.
In the third sound you can hear a pulsing sound. This is the
binaural beat! It has a frequency of 8Hz, which is the
difference between 108Hz and 100Hz.
The above video is a mono recording. It puts the same sound
into each ear and will sound the same whether played through headphones
or loudspeakers.
But here is where it gets interesting. What if we were to
instead play the frequencies into different ears. That is,
put 100Hz into the left ear and 108Hz into the right ear?
When we do this a strange thing happens: the beat pattern is generated
within our brains. This is demonstrated in the
below video listen to it with headphones:
Youll need to listen more carefully because its not as obvious as in
the first video. But the difference between the third
(combined) tone and the first and second tones (in separate ears) is
distinct. The third tone contains a beat pattern and its
frequency corresponds to the one in the first video, i.e. 8Hz.
This is very strange because the sounds are not physically meeting with
each other, and therefore there is no actual fluctuating wave to listen
to. For some reason your brain creates this beat pattern
internally. Why it does this is unknown. But it is
a phenomenon we can take advantage of, with something called brain wave
entrainment.
Brain waves
Brain waves are a type of electrical activity that takes place in our
brains and which can be observed using Electroencephalograph
(EEG) machines.
Different waveforms correspond to different levels of consciousness,
alertness , thoughts, and emotions. When we are in deep sleep
their frequencies are low, and when alert and in anxious thought the
frequencies are high. Other conscious states correspond to
frequencies in-between.
Below is a summary of different brainwave states and their frequencies.
Infra-low <0.5 Hz
Infra-low waves are the lowest frequency wave observed.
Little is known about them and they may have no value in mediation
(although included in the generator).
Delta 0.5 to 3 Hz
Delta waves occur in dreamless sleep and are possibly the
lowest that can be achieved in meditation.
Theta 3 to 8 Hz
Theta waves occur in dreaming or light sleep and make up the
most of what occur during meditation and passive creative thinking.
Alpha 8 to 12 Hz
Alpha waves occur in the awake but resting/relaxing state of
the brain and in more active meditation states.
Beta 12 to 38 Hz
Beta waves occur during the alert state of mental activity
such as concentration. They are further described in three
bands: Lo-Beta 12 to 15 Hz
Musing or contemplating thoughts. Mid-Beta 15 to 22 Hz
More active thoughts. Hi-Beta 22 to 38 Hz
Highly active thoughts, anxiety or excitement.
Gamma 38 to 42 Hz
Gamma waves are the highest frequency observed.
Their purpose is unclear and they may not be of much value in
meditation (although included in the generator).
By exposing yourself to a binaural beat frequency, your brain can be
encouraged or entrained to enter into a state corresponding to that
frequency. For example listening to a beat frequency of 8Hz
can cause your brain to start resonating to that frequency and
produce the same electrical state internally. The result of
this is that you begin to experience the state matching that
wave. Referring to the above chart, 8Hz is a low-end Alpha
wave, which corresponds to a resting state. In other words,
it can cause you to feel sleepy.
These effects are not immediate and not always strong.
Results will differ from person to person and may be different from one
time to the next. But the point is we can make use of this
phenomenon to alter our internal states. Needless to say this
can be very useful as a meditation aid, a way of achieving an altered
state of consciousness, or making oneself feel better or different.
Using the beats generator
To use this sites binaural beats generator, start by pressing the
Binaural button near the bottom right of the main screen.
This will bring up the binaural sub-menu:
There is a lot here so lets break it down. On the top line
it says Beat frequency, followed by the number 8, followed by
Hz. This says the frequency to be created is 8 Hertz, which
is the default.
Underneath that is a grey slider bar with a green control
button. By clicking and dragging that green button left and
right, the frequency will change, in this case between 0Hz and
12Hz. When the sound is playing, this can also be changed
using the left and right arrows on the keyboard, which is useful when
full-screen mode is active or eyes are closed. The frequency
value also appears on the on-screen menu press the S key to
activate. When the Timer is activated and displaying on-screen,
the frequency will appear to the right of the elapsed time, allowing
it to be seen continuously. To see the frequency without the
time, pause the timer at 0:00:00.
Immediately underneath that is a set colored bars, showing brown, red,
orange, and yellow. These correspond to the brainwave
frequencies mentioned in the above table and can help in the selection
of frequencies.
Returning to the top line, the next item is a check box with the words
Swap L/R. This swaps the frequencies in the left and right
speakers. As mentioned, creating a binaural beat requires
playing two separate frequencies in different ears. By
default the left speaker plays the lower of these frequencies and the
right speaker plays the higher. By ticking this checkbox the
operation will be reversed, with the left speaker playing the higher
frequency. Can also be toggled by pressing Shift+S.
In theory it shouldnt matter which frequency goes in which ear because
the brain will create the same beat frequency internally. But
it may have an effect and it is worth experimenting to see if a
different method is more effective.
The next section is a set of radio buttons that set the frequency
range. The first of these is Narrow, which sets the range
from 0 to 12Hz as described above.
The next item is Wide. Selecting this option will expand
the slider bar to go from 1Hz to 42Hz, to include the upper-range of
frequencies in the above chart. Below the frequency slider
the earlier color bars will shrink and four new bars will display:
light blue, dark blue, purple, and magenta. These correspond
to Beta-1, Beta-2, Beta-3, and Gamma waves respectively. This
slider uses a logarithmic scale which gives the lower frequencies
more prominence and a smaller step size. It wont go below 1Hz
because log scales cant reach zero.
The narrow range of 0 to 15 Hz typically corresponds to meditation
states and the wide range of 15 to 42Hz corresponds to alertness
states. Putting the meditation frequencies in a separate
range allows them to be more easily selected.
The next item is V-wide. Selecting this option will expand
the slider bar to a very wide range going from 12Hz to 400Hz. As
mentioned, the highest brainwave frequencies observed are 42Hz.
So frequencies above that are technically off the charts and arguably
should not have any effect. Yet they do appear to and so are
included for those who wish to experiment with them.
Looking at the above image, to the right of the beat frequency value
are two additional numbers separated by a colon, in this case saying
2:1. This is the ratio of the upper-to-lower of the two
(actual) frequencies used to create the beat frequency. When
the ratio becomes close to whole numbers the beat appears to become
more prominent, which is why this information is included.
When moving the slider left and right you will see different ratios
appear, such as 6:5, 4:3, 7:4, 3:1, etc. They will appear
strongly (in black) when nearby, weakly (in grey) when farther away,
and not appear at all when too far away. By holding down a
Shift key and pressing the left and right arrow keys the beat
frequency will jump directly to the next convenient ratio.
Like the Wide range, this scale is also logarithmic with frequencies
closer together at the high end. The additional colors below
the slider bar pink, light orange, lighter orange, and dark yellow
correspond to ratios of 2:1, 4:1 and 8:1 respectively and dont have
any special meaning otherwise.
The next item is Bars. Selecting this option will change
the slider range as shown:
This option has to do with music. In musical notation, notes
are often grouped into timing intervals known as measures or
bars. A bar is an interval that appears to represent a
natural timing duration that our brains like to receive and process
auditory information in. It has a duration of approximately
1.8 seconds.
When a rhythmic beat of that duration is heard it will sound more
pleasant than one that is of shorter or somewhat longer
duration. Rhythms can also sound pleasant when the beats fit
into an exact multiple of that 1.8 seconds duration, such as 2, 3, or
4 beats in a bar. These multiples correspond to musical time
signatures that are often written as 2/4, 3/4, and 4/4 respectively.
What this Bars option aims to do is imitate a musical rhythm
pattern. The frequency slider has a small number of positions
that it can be set to.
The left-most position of the slider represents one beat per
bar. This is one binaural beat per 1.8 seconds, which is a
frequency of 1/1.8 = 0.56Hz. The next position is two beats
per bar, giving a frequency of 2/1.88= 1.12Hz. This continues
all the way to the right-most position of 36 beats to a bar, with a
frequency of 20.1Hz.
As can be seen, not all beat multiples are included. Those
that are, are multiples of 2 and 3. For some reason our
brains prefer to process rhythm patterns in just those multiples, and
not others like 5 or 7. Thus the included beat multiples are
1,2,3,4,6,8,9,12,16,18,24,27,32,36.
The beat multiple number appears to the right of the
frequency. It also appears on the sound menu and on the
on-screen timer instead of the frequency.
To the right of the radio buttons is a check-box option
sort2. Selecting this brings up the display:
This represents a resorting of the beat numbers into
complexity. To explain this, the below table show the beat
numbers and their factors:
Beat
Factors
n-factors
1
-
0
2
2
1
3
3
1
4
2x2
2
6
2x3
2
8
2x2x2
3
9
3x3
2
12
2x2x3
3
16
2x2x2x2
4
18
2x3x3
3
24
2x2x2x3
4
27
3x3x3
3
32
2x2x2x2x2
5
36
2x2x3x3
4
The first column is the beat number, the central column shows its
factors (all multiples of 2 and 3), and the final column shows the
number of factors. The number of factors represents how many
times a bar has been subdivided, and arguably therefore, represents
how complex the beat number is and how much work your brain needs
to do to figure out the subdivision pattern. It can also be
observed (from listening) that beat numbers with more factors are
more stressful to listen to. E.g. 27 can be easier to listen
to than 16, despite being a higher beat frequency.
Therefore to take advantage of this information, a second sorting
method is provided. It sorts by the number of factors, then
the beat number. The resulting sort order then becomes
1,2,3,4,6,9,8,12,18,27,16,24,36,32.
The slider bar is then colored using different shades of blue rather
than the rainbow because it is not in frequency order. Each
unique shade of blue represents the same number of factors.
So which sorting method is better? The second method is
probably more useful but both methods have their place. It
depends on how your brain might be processing information at the
time. So it is worth making use of both methods, or at least
taking advantage of the knowledge about factor complexity if using only
the first method.
How to use the generator
There are a number of ways to use the beats generator.
As a general guide however, use the lower range of frequencies below
12Hz to invoke meditative effects and the upper range to invoke
alertness. The effects will vary from person to person and
from time to time. So your usage may need to be different
each time.
You could try moving the slider to frequency and listening for a while,
and then moving to another frequency and listening to that.
It takes time for your brain to adjust to a frequency. So let the
chosen position sit for a while perhaps 10 to 30 seconds until this
adjustment takes place. It is also best to make gradual changes
rather than jumps.
One difference between binaural beats and the other sound options
(rain, wind, thunder etc.) is that, while the other sound options
normally produce relaxing effects, binaural beats can be both relaxing
and harsh. This harshness however is not necessarily
something bad or to be avoided. On the contrary, it has the
potential to be beneficial. The reason is because it is
something your mind can adjust to, and once adjusted to, it can become
relaxing, and this can lead to a mental strengthening overall.
Consider physical exercise as an analogy. When we do exercise
such as weight lifting for example, to make progress we must push
ourselves to a level above our current ability by lifting weights
heavier than we are used to. As first this is difficult and
likely unpleasant. But after a while we adjust and become
stronger, leaving the weights now within our ability to easily
lift. In much the same way the stressful frequencies cause
our minds to adapt and become better able to cope with hearing
them. This later translates to being better able to cope with
other stressful stimuli in life.
Listening for long periods, such as more than 10mins can become tiring
for the ears. To compensate, it is recommended to lower the
volume. This can be done by dragging the volume slider with a
mouse. It can also be done by pressing the down-arrow key
several times. So as you listen and steadily change
frequency, also gradually lower the volume when it seems necessary.
Using the beats generator for a meditation session
Below is an example on how to use the generator for
meditation. It will use the Beta waves between 3Hz and 8Hz.
Start with the beat frequency set to the default value of 8Hz and the
Volume slider set to 100. Click the (sounds) Play button and
listen for a while. Ideally it should sound slightly
intense/irritating at this point. If it is too intense, drag
the frequency slider to a higher value, such as 9Hz.
Now take note of the volume. It should be at a comfortable
level. If it is too loud, adjust the volume either by
dragging the slider or pressing the down arrow key until it is
comfortable to hear.
Listen for a while. After a minute or so the sound should
(hopefully) become less irritating and more pleasant. This is
because you have partially adjusted to the frequency. Leave
that run for as long as it is still pleasant.
But after a while it will start to become
unstimulating/boring. This is because you have fully adjusted
to the frequency. At this point you need to make it more
intense by lowering the beat frequency. To do this, press the
left arrow key a few times until it becomes mildly intense/irritating
again. As before, allow it to run until it becomes pleasant,
then boring again. At which point you will further lower the
beat frequency. Repeat this process as required.
After a while it might seem like the sound is getting loud.
This isnt because it is any louder, but because your ear/brain is
becoming irritated by the continual sound. So you need to
lower the volume. To do this, press the down arrow key a few
times or drag the Volume slider until the sound level becomes
comfortable.
Another situation where sound levels become unpleasant is when changing
between beat frequencies. This is particularly true near the
end where you increase the frequency quickly. Again, solve
this problem by pressing the down arrow key a few times.
So this will be the process. The beat frequency will be
continuously lowered each time you adapt to an old one. And
the volume will also be lowered are required.
Eventually youll need to stop. Either because youve been at
it too long and are getting tired, or youve reached a frequency that
youve unable to go below. So you need finish up.
But rather than just clicking Stop, it is best to unwind the
process. One method is to slowly lower the volume to zero
over a period of a few minutes.
Another effective method is to start increasing the frequencies
toward the starting frequency. So press the right arrow key a
few times to get a higher frequency. Then wait a short while,
such as 30 seconds, and press the right arrow key a few more times, etc.
The aim will be to go back up to near the starting point, but doing so
more quickly than when going down. While doing this it will
be necessary to further lower the volume, and also doing so more
quickly.
It is not necessary to get all the way back to the starting point in
frequency, just near it. E.g. 6Hz instead of 8Hz.
Right near the end, lower the volume all the way down to
zero. Then click on Stop. Wait a while to adjust to
the silence.